Pecan Pie Brownies

December2912 004

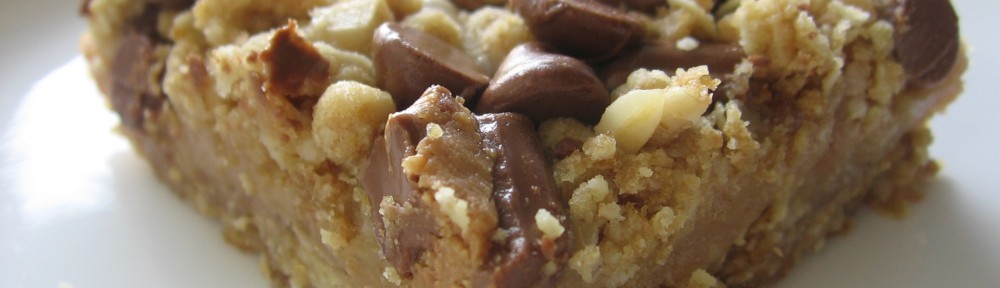
While going through my Google Reader, a recipe caught my eye. Pecan Pie Brownies? Yum, I love nuts and our Kentucky Derby Pie, which has similar ingredients, was awesome.

I did cheat and use a boxed brownie mix as the base, Ghiraradelli since they taste the most homemade in my opinion. These came together in a snap and I was enjoying a nice warm brownie in no time.

These were gooey and sweet but not as good as the pie. I may have had my hopes up a bit too high since we love the pecan and chocolate combo but I felt these could have been better. I may try again using a homemade brownie as the base but I don’t know if that will help, I just felt the topping needed a bit more flavor, salt? maybe bourbon, maple syrup? IDecember2912 006 am not sure. I will say that I ate half a pan in a day so these are by no means bad.

If you are looking for a yummy twist on a typical brownie than I would recommend these, if you however want pecan pie and chocolate, make this pie.

I rate this recipe a 7.5

Pecan Pie Brownies
from here

For the Brownie Layer (I cheated and used a box mix)
1/2 cup (1 stick) unsalted butter
1 cup + 2 Tbsp sugar
1/2 cup + 2 Tbsp cocoa
1/2 tsp salt
1/2 tsp baking powder
1/2 tsp espresso powder, optional
1/2 Tbsp vanilla
2 eggs
3/4 cups flour
1 cup chocolate chips

For the Pecan Pie Layer
1/2 cup honey or corn syrup
1/2 cup brown sugar
2 eggs
2 Tbsp vanilla
1/4 cup (1/2 stick) butter, melted
2 cups chopped pecans
For the Brownie Layer
Preheat the oven to 350°F. Lightly grease a 8″x8″ pan

In a saucepan set over low heat, melt the butter, then add the sugar and stir to combine.

Transfer the sugar mixture to a medium-sized mixing bowl, if you’ve heated it in a saucepan. Stir in the cocoa, salt, baking powder, espresso powder, and vanilla.

Whisk in the eggs, stirring until smooth.

Add the flour and chips, again stirring until smooth.

Spoon the batter into a lightly greased 8″x8″ pan. Bake for 10 minutes while you prepare the pecan pie layer.

For the Pecan Pie Layer
While the brownies are in the oven, mix the pecan pie layer.

In a medium bowl, combine the corn syrup and sugar. Whisk until smooth.

Mix in the eggs and vanilla. Add the melted butter and stir until combined.

Stir in the pecans.

Final Assembly
After the brownies have baked for 10 minutes, remove from oven. Pour pecan pie layer over brownies and use a spatula to spread evenly to the edges of the pan.

Return to the oven and bake for 35-45 minutes until pecan pie topping is completely set.

Remove from oven and allow to cool, preferably overnight. Cut and serve with ice cream or whipped cream.

Baking Blonde’s Thin and Chewy Chocolate Chip Cookies

December 1612 002
Wow, hey readers, if there are any of you left. Last I posted a recipe was this past summer. A good one, but not good enough to get you through months of nothing I am sure.
Well, it seems life gets in the way sometimes. I will save you the long story and get right to the recipe.
I made this recipe up myself and am pleasantly surprised I like these as much as I do.  I wanted a chewy and buttery chocolate chip cookie and am surprised I enjoy the taste so much since I prefer my cookies to be a bitter thicker. Maybe next time I will try and increase the flour measurement below by a 1/4 cup and maybe add a 1/4 tsp of baking powder to my next batch for those wanting to change it up before I do.  I am posting this recipe as I made them as I  think these are a great tasting cookie and my Taste Tester actually loved them.  He informed me that he actually prefers flat chewy cookies. Who December 1612 003knew after 3 years together I would not even know he cookie preferences?
These cookies, while flat, have a nice buttery taste to them that more than satisfies my cookie craving. I decided to make these festive by adding some Holiday chips and some dark chocolate disks I had on hand but any chips will do. These were so good right out of the oven but still taste great after cooling so I am looking forward to tweaking the recipe as mentioned above to see if I can improve on these already delicious cookies. The cornstarch in the recipe helps to keep them soft and chewy so long as you don’t over-bake them.
I do want to point out that the ingredients are a bit different than some other cookies I have made as I start this recipe with cold butter (yep, you read that correct, COLD butter) right out of the fridge. I chopped it up and whipped it good with the sugars which actually beats air into the dough, which, should in theory produce a bit thicker and chewier cookie. That, along with the cornstarch should create a thicker and chewy cookie than what I got but I was not disappointed too much after I tasted them. Mine were chewy but failed to be thick due to not enough flour so I look forward to making these again soon but with my tweaks, hopefully creating the cookie I was originally trying to make.
I rate these cookies an 8.5
Baking Blonde’s Thin and Chewy Chocolate Chip Cookies
1 stick butter cut into 1/2 inch chunks (right from the fridge)
1 cup brown sugar
1/2 cup sugar
1 egg
1 tsp Vanilla
1 3/4 cups flour
1 tsp baking soda
1/2 tsp salt
1 TBS cornstarch
1 cup chips (i used 1 cup Holiday chips and 1/2 cup Nestle’s Dark Chocolate)
Preheat oven to 350 degrees.
Cut butter into 1/2 inch chunks. In a medium bowl, cream together the butter and sugars until smooth (about 2-4 minutes) until creamy (the dough will start to stick together after a while as the butter blends with the sugars, beat until this happens.
Add egg and vanilla and mix to combine. Mix in the flour, baking soda, salt and cornstarch and mix until the dough comes together.
Chill for 10 minutes or longer (cover so the dough does not dry out)
Scoop out the dough using cookie scoop or Tablespoon onto parchment lined baking sheet (so they don’t stick)
Bake for 8-10 minutes until golden and set.
Cool and enjoy (or eat warm)

Chocolate Lovers Cheeecake


With family coming to town I once again baked up a cheesecake. It has become a tradition to eat cheesecake and drink Margarita each summer when they visit. This year while I was searching for a flavor to make, my Taste Tester suggested a chocolate one with some sort of ‘topping’ and by ‘topping’ he wanted the ganache from one of his all time favorite desserts. 

I found this recipe on Annie’s Eats and knew it would be perfect. They only changes I made were that I used a different topping. The end result was rich and sinful and so wonderfully smooth. Like all cheesecakes, this is best served after a chill in the fridge for a day or two.

If you love chocolate, this is for you, its flavor is more mild than this recipe but still packs a chocolate punch enough to satisfy your craving.

I rate this recipe a 9

Chocolate Lovers Cheesecake
from here

For the crust:
1½ cups finely ground chocolate cookie crumbs*
3 tbsp. sugar
4 tbsp. unsalted butter, melted

For the cheesecake: 
½ cup sour cream
2 tsp. vanilla extract
1 tsp. espresso powder or instant coffee granules
8 oz. bittersweet chocolate, finely chopped
3 (8 oz.) packages cream cheese, at room temperature
3 tbsp. unsweetened cocoa powder, sifted
¼ tsp. salt
1¼ cups sugar
3 large eggs, at room temperature

For the glaze: (i did not use this recipe)
3 oz. bittersweet chocolate, finely chopped
6 tbsp. heavy cream
1 tbsp. unsalted butter, at room temperature

*I used this ganache recipe:

Bittersweet Ganache
6 ounces bittersweet chocolate, finely chopped
2/3 cup heavy whipping cream
1 tsp vanilla extract

Place chopped chocolate in a medium bowl.

In a small saucepan, bring the cream to a boil. Remove pan from heat and add the chopped chocolate. Let stand for 1 minute then gently stir until chocolate is melted and the glaze is smooth. Gently stir in the vanilla. Transfer glaze to a small bowl and cover the surface of the glaze with plastic wrap and let cool for 5 minutes at room temperature before using.

Directions:


To make the crust, preheat the oven to 400˚ F.  Line the bottom of a 9-inch springform pan with a round of parchment paper.  In a medium bowl combine the cookie crumbs, sugar, and melted butter.  Stir with a fork until all the crumbs are moistened.  Add the crumb mixture to the springform pan and gently press about 1 inch up the sides of the pan.  Press the rest of the crumbs into an even layer over the bottom of the pan.  Bake for 10 minutes, then transfer to a wire rack to cool.  Reduce the oven temperature to 300˚ F.

To make the crust, preheat the oven to 400˚ F.  Line the bottom of a 9-inch springform pan with a round of parchment paper.  In a medium bowl combine the cookie crumbs, sugar, and melted butter.  Stir with a fork until all the crumbs are moistened.  Add the crumb mixture to the springform pan and gently press about 1 inch up the sides of the pan.  Press the rest of the crumbs into an even layer over the bottom of the pan.  Bake for 10 minutes, then transfer to a wire rack to cool.  Reduce the oven temperature to 300˚ F.

To make the filling, combine the sour cream, vanilla, and espresso powder in a small bowl.  Whisk to blend and set aside.  Melt the chocolate in a double boiler or in the microwave (in short intervals, stirring frequently) until completely smooth.  Set aside and let cool slightly.

In the bowl of an electric mixer, combine the cream cheese, cocoa powder, and salt.  Beat on medium-high speed until smooth and fluffy, about 2 minutes.  Beat in the sugar and continue mixing about 2-3 minutes more, scraping down the bowl as needed.  Add the cooled chocolate to the bowl and mix on medium-low speed.  Beat in the sour cream mixture just until evenly blended.  Beat in the eggs one at a time, mixing each just until incorporated.  (Don’t over-beat once the eggs are added or the cheesecake will puff too much.)

Pour the filling into the cooled crust.  Bake until the center jiggles very slightly when nudged, about 50-60 minutes. Transfer to a wire rack to cool for 1-2 hours.  Then cover and refrigerate until thoroughly chilled, at least 8 hours or overnight.

* (I did NOT use this recipe, i followed the recipe I listed above)

To make the glaze, place the chopped chocolate in a small heatproof bowl.  Bring the cream to a simmer in a small saucepan or in the microwave.  Pour over the chocolate and let stand briefly, 1-2 minutes.  Whisk just until a smooth ganache has formed.  Whisk in the butter until completely incorporated.  Pour the glaze in an even layer over the chilled cheesecake.  Chill thoroughly.

To serve, carefully unmold the sides of the springform.  Run a sharp knife under hot water to warm the blade, and wipe dry with a towel.  Slice cleanly, wiping the blade between slices and reheating as necessary.  Serve chilled.

No Bake Chocolate Drenched Oatmeal Coconut Squares

I love coconut though I do not bake with it nearly often enough. When this recipe popped up in my GoogleReader, I starred it immediately. I love no-bake treats, especially during the warm summer months. I whipped these up over the weekend in no time.

The original recipe calls for a 9×9 pan but I opted to use an 8×8 as I wanted my bars a little more substantial and not so thin. I also found that the amount of butter/coconut oil was more than what I needed to completely wet my dry ingredients. I did melt the original amount but only used about 3/4 of it. I would recommend pouring it in and stirring slowly as you may find you don’t need to use it all either. Next time I make these I will cut the amount and see if I can find out the amount that works for me. I also cut the honey down to only 3 TBS as I did not want the flavor to overpower the coconut. I am glad I did this as I did taste the honey but it was not overpowering.

After pouring the chocolate over the bars I topped mine with toffee bits. I must say these bars were really satisfying. I liked my modifications so feel free to make these bars you own. I think some toasted coconut on top may be good as well as some chopped almonds. I will be making these again this summer I am sure.  My only complaint is these are tough to cut and transport or serve as they do tend to be a bit crumbly unless right from the fridge.

I rate this recipe an 8.5

Thin + Chewy Chocolate Drenched Coconut Oatmeal Squares
recipe found here 

1 1/2 cups old fashioned oats
1 1/2 cups shredded, sweetened coconut
1/4 cup brown sugar, loosely packed
pinch of salt
1/4 cup unsalted butter
1/4 cup coconut oil (measured solid)
1/4 cup honey

Spray a 9×9 pan with nonstick spray.

In a large bowl, combine oats, coconut, brown sugar and salt. Heat a small saucepan over low heat and add butter and coconut oil, stirring until melted. Add the butter and oil to the oat mixture, then add the honey and stir very thoroughly until the entire mix is moistened. Press it into the pan and stick in the fridge for 15 minutes.

Chocolate layer

8 ounces good-quality chocolate, chocolate
2 tablespoons coconut oil (measured solid)

Using the same saucepan that you melted the butter and oil in, add the chocolate and oil and stir over low heat until melted. Remove the pan from the fridge and pour the chocolate evenly over top, spreading with a spatula or spoon. Place back in the fridge for about 30 minutes. When ready to eat, either cut the squares in the pan, or gently lift the square out and place on a cutting board to cut. It helps if the bars somewhat come to room temp before cutting, as they will slightly crumble a bit if super cold!

No Bake Peanut Butter and Oatmeal Bars

I love a good no-bake dessert, especially during the warm months. I have made a several no-bake desserts over the years and love trying out new recipes.

These bars are so super quick to make, take few ingredients and are perfect for a last minute dessert. These bars are a bit like my other bar recipes and no-bake cookies combined. The flavor of peanut butter shines and the oatmeal makes these bars chewy and soft. I love the combination of peanut butter and oatmeal and to top it all off a yummy chocolate ‘frosting’.

The trick to these is that the mixture needs to boil for about 1 1/2 to 2 minutes in order for the bars to set. If you don’t boil long enough they will still be good, but just really gooey and difficult to eat. You can remedy this by keeping them chilled but just be warned at room temperature they will be messy! I will be making these again when I need a quick dessert, I am rating these an 8.5 only because I do like the other bars a bit better.

I rate this recipe an 8.5

No Bake Peanut Butter and Oatmeal Bars

3 Cups Oats
2 Cups Sugar
1 Cup Peanut Butter
1/2 Cup Milk
1/4 Cup butter
1 tsp vanilla

1 cup chocolate chips
1/2 cup butterscotch chips
1/2 cup peanut butter

Lightly spray an 8×8 pan with Pam.

In a medium sauce pan, melt the butter, sugar, and milk. Over a medium high heat, bring to boil making sure to stir constantly. Continue to stir and boil for 1 1/2 to 2 minutes after it reaches a rolling boil.

Remove the pan from heat and stir in peanut butter and vanilla until peanut butter is melted. Stir in oats.

Pour mixture into prepared pan and press lightly and make sure to spread out mixture evenly.

In a medium sauce pan, heat chips and peanut butter over medium heat and stir until melted. Pour over bars and spread evenly.

Allow bars to set before serving.

Soft and Chewy Chocolate Chip Cookies

This recipe comes from an old church cookbook I have had forever. I have been trying to go through all of my cookbooks and actually try some of the recipes I have marked that sound good. I tend to get into a routine and bake the same few desserts over and over again that me and my Taste Tester love.

These cookies lived up to the title, they were soft and chewy but not overly cake-like. I really enjoyed them but do prefer a few other on my site more. My Taste Tester enjoyed them and has said I can make them again, so I guess they have his seal of approval.

These are nothing ‘special’ just a good old cookie recipe.

I rate this recipe an 8

Soft and Chew Chocolate Chip Cookies
from the St. Mary’s Cookbook 2009

1 cup butter
1/2 cup sugar
1 cup brown sugar
2 eggs
1 tsp vanilla
1 cup bread flour
1 1/2 cups flour
1 tsp baking soda
1/2 tsp baking powder
1/2 tsp salt
1-2 cups chocolate chips
1 cup nutsPreheat oven to 350.

Line baking pan with parchment paper.
Cream butter and sugars with a mixer until light and fluffy. Add eggs and vanilla and mix until combined. Slowly add the bread flour, flour,  baking soda, baking powder and salt. Mix just until combined.
Add chips and nuts.
Drop by spoonfulls on baking sheet. Bake about 8-12 minutes until just golden. Do not overbake. Cool on rack or baking sheet.

Store covered and sealed.

Flourless Peanut Butter Oat Bars

I made up this recipe based on the Hand Mixed PB Cookie recipe I love. The great thing about both the cookies and the bars is that they are flourless. I have no dietary restrictions but I know several people who do and they struggle to find good cookie or dessert recipes that don’t call for strange ingredients in the place of flour.

These bars did not even require a mixer, I just stirred by hand. They were thrown together in less than 5 minutes and with 20 minute bake time were ready to enjoy in no time.

The bars came out chewy in the center and a little more crisp around the edges,  a little mix of texture to please everyone. I found these to not be too sweet and a small bar satisfied my craving. These would be good for a quick treat when you don’t want to dirty a bunch of bowls or use your mixer.

I rate these an 8 (if for no other reason than they are super simple)

Flourless Peanut Butter Oat Bars
adapted from here

1 cup creamy peanut butter
3/4 cup brown sugar
1/4 cup sugar
1 egg
1/2 teaspoon baking powder
pinch of salt
3/4 to 1 cup oatmeal  (add 1/4 cup at a time until desired consistency, oatmeal should blend in but dough should not be dry or too stiff)
chips (optional)

Spray an 8×8 pan with Pam.

Preheat oven to 350.

In a medium bowl stir together peanut butter and sugars. Add egg and baking powder. Stir to combine. Add salt and oatmeal. Stir until mixed. Gently fold in chips if using.

Press into prepared pan.

Bake for 15-22 minutes (do not overbake)

Peach Crisp with Maple Cream Sauce

My Taste Tester is not a big fan of peaches but I decided to give this recipe a go anyway. It was simple to make and I whipped it up in not time flat. I found the crisp to have good flavor but the the topping did not stay crisp past a day so if you are making this, it is best to serve the day you make it (preferably warm).

The sauce was smooth and creamy with a subtle maple flavor. I don’t think I reduced my sauce enough as I thought the maple flavor could have been a bit more pronounced than what it was. I enjoyed this dessert warm with some vanilla icecream. The sauce would be good on a blondie or maybe even pancakes.

This was not my favorite dessert and I doubt I will be making it again, but it was nice for a change.

I rate this recipe an 8.5

Peach Crisp with Maple Cream Sauce
from here

6-7 fresh whole peaches
1 cup flour
1/2 cup Sugar
1/2 cup Light Brown Sugar, Firmly Packed
1/2 teaspoon Ground Cinnamon
1/2 teaspoon Ground Nutmeg
1/4 teaspoon Salt
1 stick Butter (1/2 Cup)
1/2 whole Lemon
7 Tablespoons Real Maple Syrup, Divided
1-1/2 cup Whipping Cream
3 Tablespoons Light Corn Syrup

In a medium bowl, mix flour, sugar, light brown sugar, cinnamon, nutmeg and salt using a fork or pastry cutter. Cut butter into small pieces and gradually add to flour mixture until evenly mixed.

Peel peaches into a bowl. Add the zest from half a lemon. Squeeze juice from lemon half and stir in with peaches and zest. Add 2 tablespoons real maple syrup to peaches, stir well.

Pour peach mixture into a small pan (8” or 9” square) and cover evenly with crumb topping. Cover with foil and bake at 350ºF for 15 minutes. Remove foil and bake for an additional 20 to 30 minutes or until crisp and brown on top.

Maple Cream Sauce:

Pour whipping cream into a saucepan. Add 5 tablespoons real maple syrup, 3 tablespoons corn syrup and stir over moderate heat until thickened and reduced by about one-third, approximately 15 minutes. Refrigerate mixture until it is cold and thick, or set the saucepan into a small bowl of ice (the ice will melt and turn into ice water). Stirring your mixture, it will cool and thicken in about 15 minutes. Drizzle sauce over peach crisp. Serve warm.

Dark Chocolate Brownies

My Taste Tester and I were hungry for some icecream and hot fudge and what goes better with those two sweets than a rich chocolatey brownie? I typically make these but had seen a recipe for a dark chocolate brownie that I had been wanting to try.

These came together in no time but when I went to pour the batter into the 9×13 pan called for I found the batter to barely cover the bottom of the pan. I knew since there was no baking soda or baking powder in the recipe that they would turn out super thin. I decided to transfer the batter to an 8×8 pan and they still turned out thinner than I would have liked so I can’t imagine using a larger pan for these.

The results were chocolatey but not overpowering. These are not my favorite brownies but did hit the spot when covered with vanilla icecream and hot fudge. I wish the flavor would have been a bit deeper or more complex, maybe some chocolate chips or walnuts thrown in would help.

I rate this recipe a 7.5

Dark Chocolate Brownies
found here

6oz. 70% cacao chocolate (chopped)
6oz butter
1 1/2 cups sugar
3 large eggs
1tsp vanilla extract
1 cup flour

Preheat oven to 325
Spray 9×13 pan with PAM (i used 8×8 pan)

Melt butter and chocolate either in medium sized microwave safe bowl in microwave (stirring every 20 seconds until smooth) or in a double boiler. Once melted stir in sugar and mix well. Add vanilla and eggs mixing well.
Add flour and stir to combine.

Pour into prepared pan and bake for 25-35 minute until center is set (do not overbake)

Soft Frosted Sugar Cookies

I love some good sugar cookies. I usually only make them around the holiday season but had a craving this week that I needed to satisfy. I typically only make my sugar cookie recipe since I know they are great and my friends and family love them and I like rolled sugar cookie recipes. Since I was going to be the primary person consuming this batch of cookies I took the opportunity to try a new recipe.

I have had this recipe down to try forever so gave it a whirl. The dough came together super quick but did require some chill time before baking. The end result are as the title promises “soft”! In fact, it has been 4 days and they are still super soft, almost too much so. These turned out much more cake-like than I would typically like but they did have a great flavor and were a pleasant change of pace.  I topped with a simple buttercream frosting and found the frosting was the perfect compliment to the cookie. I may add a bit more vanilla to the recipe next time if I make them again as I found they could use a bit more flavor in my opinion. With the frosting they were fine, but alone needed a little something more.

If your family loves super soft cookies, these will be right up your alley. My Taste Tester enjoyed them but admitted he really enjoyed eating them just to get eat the frosting. He has been known to eat this frosting with a spoon so that is no surprise to me.

I rate these cookies an 8

Soft Frosted Sugar Cookies
from here

4 1/2 cups flour
4 1/2 tsp. baking powder
¾ tsp. salt
1 1/2 cups (3 sticks) unsalted butter, at room temperature
1 1/2 cups sugar
3 large eggs
5 tsp. vanilla extract

*frosting recipe below can easily be doubled for a cake
Recipe from a cake decorating class I took years ago

Buttercream Frosting
4-5 cups confectioners’ sugar, sifted
1/2 cup butter (1 stick) softened
1/2 cup shortening (NOT butter flavored)
2 TBS vanilla extract
3-4 TBS milk or cream
Gel Food coloring (optional)

Preheat your oven to 350˚ F.
Line baking sheets with parchment paper or silicone baking mats.

In a medium bowl combine the flour, baking powder and salt, and whisk together to blend.  In the bowl of an electric mixer, combine the butter and sugar and beat together on medium-high speed until soft and fluffy, about 2-3 minutes.
Beat in the eggs one at a time, mixing well after each addition and scraping down the bowl as needed. Add vanilla and mix to combine.
Slowly add the dry ingredients mixing just until incorporated and evenly mixed.
Cover and chill the dough for 1 hour.

When you are ready to bake the cookies, scoop a scant quarter cup of dough and roll into a ball.  Flatten the ball slightly and place on the prepared baking sheet.  Repeat with the remaining dough, spacing the cookies at least 2-3 inches apart.

Bake about 10 minutes or just until set.  (Do not overbake!  The edges should be no more than very lightly browned if at all.)  Let cool on the baking sheet for several minutes.  Transfer to a wire rack to cool completely.

For the frosting. Cream the butter and shortening with a mixer until combined. Slowly add sugar a bit at a time. Add vanilla and mix to combine. Add milk or cream 1 TBS at a time until a spreadable consistency is achieved. Keep beating frosting for 3-6 more minutes until fluffy. Tint with gel food coloring if desired.  Frost cookies. Store in an airtight container.